Fresh homegrown vegetables ready to harvest in 30 days

5 Fast Growing Vegetable You Can Harvest in Just 30 Days

In an age where convenience meets consciousness growing your own vegetables has become more than just a trend it’s a movement.Whether you’re working with a sprawling backyard or a modest apartment balcony cultivating fresh produce at home is not only possible it’s incredibly rewarding.Even better some vegetable grow so quicly you can start enjoying your harvest in as little as 30 days/

This guide will walk you through five fast growing vegetable perfect for beginner gardener apartment dwellers and anyone eager to enjoy homegrown food with minimal waiting. Let’s dive into the garden of quick win.

Why Fast Growing Vegetable?

Fast-growing vegetables are a dream for new gardener or those with busy schedule. Here are a few reason why they should be your go to choice:

* Quick Results: Motivation comes easy when you see fast progress.

* Ideal for Small Spaces: Many fast-maturing crops thrive in containers.

* Perfect for Succession Planting: Harvest one plant another—maximize space and yields.

* Great for Kids: Short growth cycles are perfect for keeping children engaged.

* Season Flexibility: Enjoy multiple planting cycles in spring,summer and fall.

With these benefit in mind let’s explore the five superstar veggies that promise a speedy harvest.

1. Radishes: Crunchy,Spicy and Ready in 25 Days

Why Grow Radishes?

Radishes are one of the quickest growing vegetable often ready to harvest in just 20 to 25 days. Their sharp peppery flavor add zing to salad and sandwiche.

Growing Tip:

* Soil: Loose well-drained soil

* Sunlight: Full sun to partial shade

* Watering: Keep soil consistently moist

* Container-Friendly: Yes shallow pots work well

Harvesting Tip: Once they reach about an inch in diameter they’re ready to pull.Leaving them in the ground too long can make them woody or bitter.

Popular Varieties: Cherry Belle French Breakfast White Icicle

2. Arugula: Peppery Leaves in Just 20 Days

Why Grow Arugula?

If you love flavorful greens arugula is a must.It mature in as little as 20 days and thrives in cooler weather.

Growing Tip:

* Soil: Nutrient-rich and well-drained

* Sunlight: Partial shade is ideal

* Watering: Keep it evenly moist

* Container Friendly: Absolutel a shallow tray is sufficient

Harvesting Tip: Pick individual leaves when they’re 2-3 inches long or harvest the whole plant when it’s about 6 inches tall.

Popular Varieties: Astro, Rocket, Slow Bolt

3. Lettuce: Crisp Refreshing and Harvestable in 28 Days

Why Grow Lettuce?

Lettuce is one of the easiest and most rewarding leafy green to grow.It germinate quickly and grow well in small container.

Growing Tip:

* Soil: Loose moist and rich in organic matter

* Sunlight: Partial shade or morning sun

* Watering: Keep it evenly moist

* Container Friendly: Yes even window boxe work

Harvesting Tip: Use the “cut and come again” method to keep your lettuce producing for week.

Popular Varieties: Buttercrunch Salad Bowl Romaine

4. Spinach: Nutrient-Rich and Ready in 30 Days

Why Grow Spinach?

Spinach is a cool weather crop packed with nutrient like iron,calcium and vitamins A and C. It grow quickly and is great for smoothies sautés and salad.

Growing Tip:

* Soil: Fertile and well-drained

* Sunlight: Partial to full sun

* Watering: Keep soil evenly moist

* Container-Friendly: Yes, but needs depth of at least 6 inches

Harvesting Tip: Harvest young leaves once they’re about 3 inches long for best flavor.

Popular Varieties: Bloomsdale, Baby Leaf Space

5. Green Onions: Regrow from Kitchen Scrap in 21 Days

Why Grow Green Onion?

Also known as scallions green onion are versatile fast growing and incredibly easy to grow from kitchen scrap.

Growing Tip:

* Soil: Moist and well-drained

* Sunlight: Full sun to partial shade

* Watering: Water consistently but avoid soggy soil

* Container-Friendly: Ideal for small jar or pot

Harvesting Tip: Cut the green tops once they reach 6-8 inches tall.They will continue to regrow for multiple harvest.

Popular Varieties: Evergreen Bunching White Lisbon

Getting Started: Tool and Tip for Success

To maximize your success, gather a few basic:

* Quality seed

* Organic potting mix

* Watering can or spray bottle

* Containers with drainage holes

* Label for plant identification

Quick Tips:

* Start with easy wins like radishes and arugula.

* Use companion planting to maximize space and repel pest.

* Monitor daily for water and sunlight needs.

* Don’t forget to fertilize weekly with an organic liquid feed.

Sustainability Bonus: Grow, Harvest, Repeat

Fast growing vegetables aren’t just convenient they’re also eco-friendly.Growing your own food reduce reliance on packaged green and cut down on grocery trip and carbon footprint.

Try succession planting. As soon as you harvest one crop plant another in its place.This ensure a continuous supply of fresh produce throughout the season.

Your Garden Your Rules

The joy of gardening lies not only in the harvest but in the journey.These five fast growing vegetable are the perfect way to start. They require minimal effort deliver result quickly and invite you into a lifestyle that’s sustainable, healthy, and deeply satisfying.

Start small. Pick your favorite from the list and plant today.You’ll be surprised how just a few minutes a day in the garden can nourish your body mind and soul.

🌿 Frequently Asked Questions About Fast-Growing Vegetables

🌱 What are the quickest vegetables I can grow at home?

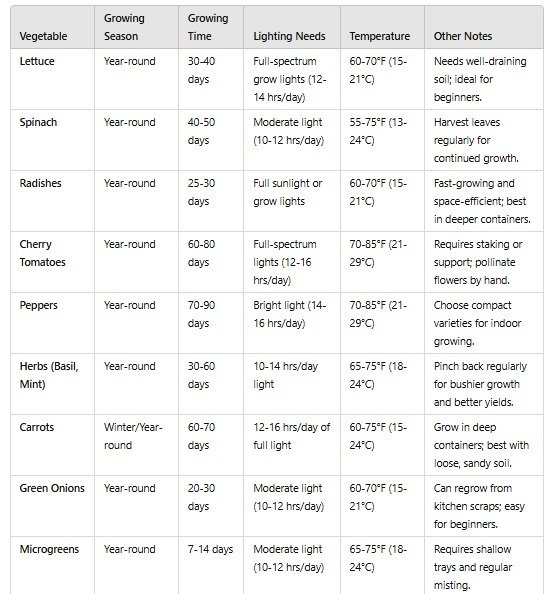
Radishes, arugula, lettuce, spinach, and green onions are some of the fastest-growing vegetables. Most are harvest-ready in just 20–30 days, making them perfect for beginners and busy growers alike.

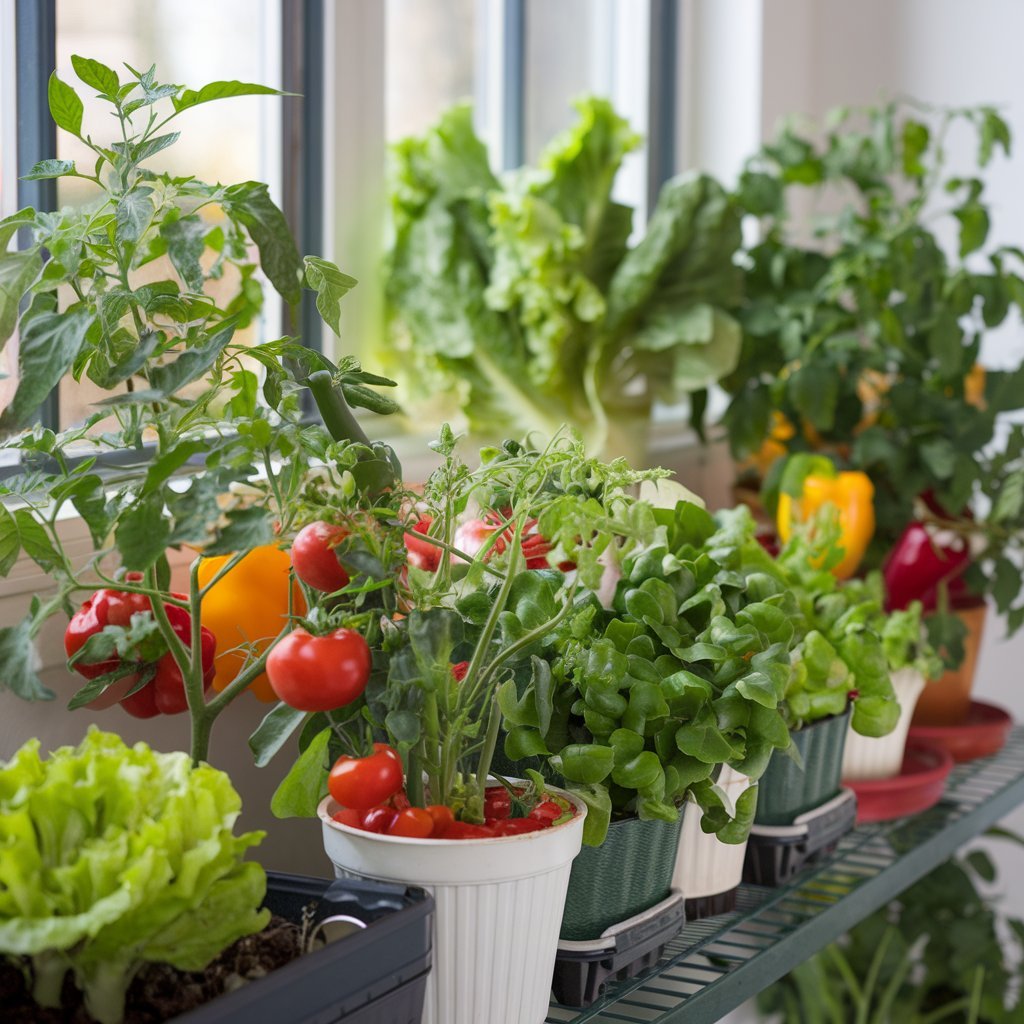
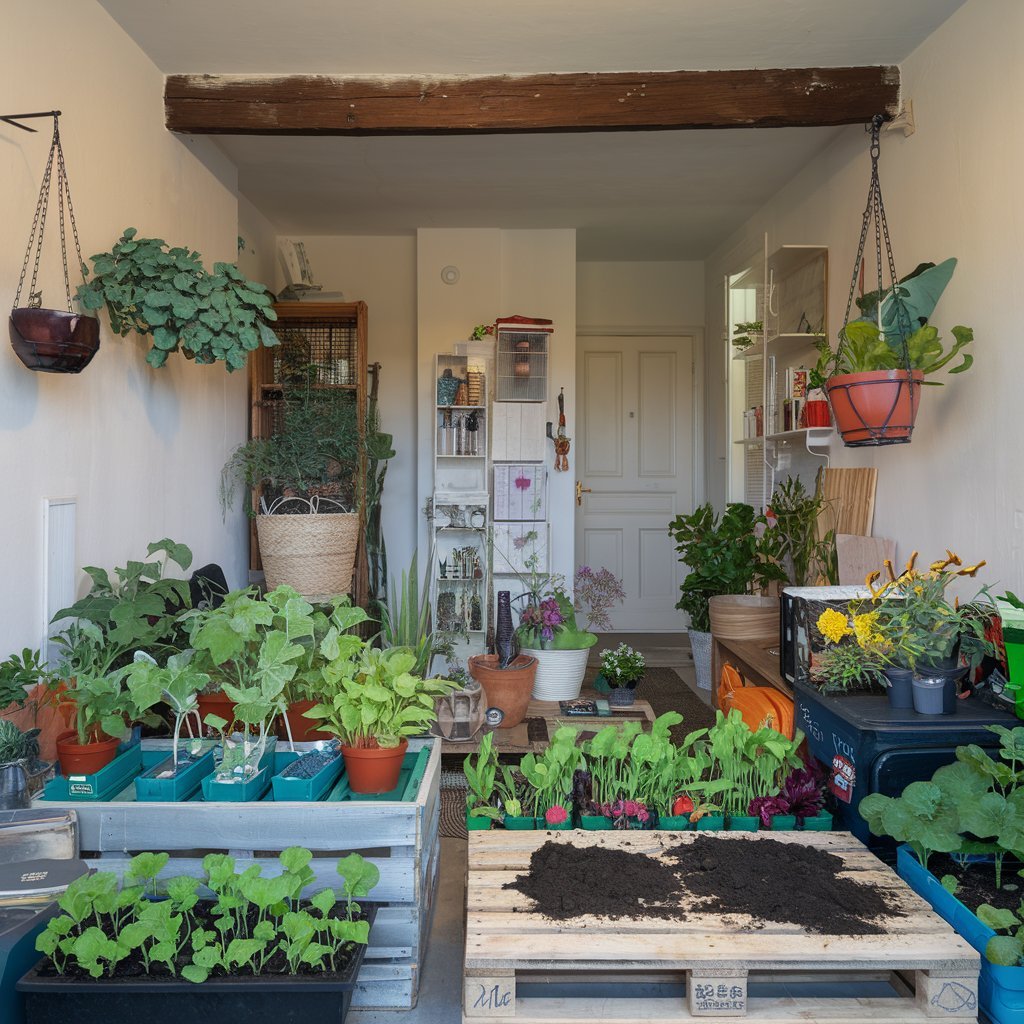
🪴 Can I grow these veggies in containers or small spaces?

Absolutely! These veggies do great in pots, planters, grow bags, and even upcycled containers. Just make sure they have drainage and get enough sunlight each day.

☀️ How much sunlight do these fast growers need?

Most of these vegetables thrive with 4–6 hours of sunlight daily. Leafy greens like spinach and lettuce can handle some shade, while root veggies like radishes prefer full sun.

🌼 Should I use fertilizer to get quicker harvests?

Yes! A gentle organic fertilizer or well-rotted compost will give your plants the nutrients they need to grow fast and strong. Avoid too much nitrogen though — especially for root crops.

📅 When’s the best time to plant these veggies?

Spring and fall are the best times for most fast-growing vegetables. They love cooler temperatures and will grow better when it’s not too hot. In mild climates, you can grow them year-round!

✂️ Can I harvest these vegetables without killing the plant?

Yes! For leafy greens, just snip off the outer leaves and let the center continue growing — it’s called “cut and come again.” For root crops, pull the whole plant, but you can regrow green onions and more from scraps in water or soil.

Ladyfinger (Okra)

How to Grow Ladyfinger (Okra) at Home Complete Guide

(Bonus: Grow Coriander With It in the Same Grow Bag!)

There’s something incredibly satisfying about growing your own vegetables at home.The fresh flavor the organic quality and the simple joy of harvesting something you’ve nurtured from seed—it’s a rewarding experience every time.And if you’re like me and love okra (also known as ladyfinger or bhindi)then growing it at home is a must.

In this guide I’ll show you exactly how to grow okra from seed in a grow bag and, as a bonus, how to grow coriander (dhania) alongside it.It’s the perfect example of companion planting—a method where one plant benefits another when grown nearby. While okra grows tall, coriander which remains short thrives in the shade below.By the time your okra plants mature your coriander will already be ready for harvest.

So let’s get started!

Why Grow Okra and Coriander Together?

This duo is the perfect match for small-space or balcony gardening.Okra grows upward while coriander sprawls low covering the soil and reducing weed growth.They don’t compete much for sunlight or nutrients making them ideal grow bag partners.

By the time the okra plants begin to need more space and sunlight, the coriander is ready to be harvested—giving you two homegrown vegetables with perfect timing.

What You’ll Need

To grow okra and coriander together here’s what you’ll need:

A grow bag (recommended size: 24-inch diameter, 12-inch depth)

Organic compost (at least 30–50% of total soil volume)

Vermicompost for additional nutrients

Okra seeds (Desi or Hybrid F1 varieties work well)

Coriander seeds (preferably with a high germination rate)

Shower head watering can

Neem cake or green additives (optional but improves soil health)

Markers or tags to label plants and sowing dates

You can find quality seeds and compost at GreenGarden.pk, where many urban gardeners trust the quality and germination rates.

Step-by-Step: Preparing the Soil

Soil quality is crucial for growing healthy vegetables.Okra loves loamy well drained nutrient-rich soil and coriander prefers moisture retaining but soft soil.

Step 1: Refresh Old Soil

If you’re using soil from last year’s grow bag, make sure to remove any old roots or debris. Sift through it if needed to break up clumps.

Step 2: Add Organic Compost

Add 30% organic compost to old soil—or 50% if you’re starting with fresh soil. Mix it thoroughly, especially the top 3 inches where roots and seeds will establish first.

Step 3: Mix in Vermicompost and Premium Organic Mix

Top up the grow bag with a blend of vermicompost and premium compost.

The result? Soft, crumbly soil full of life. And it smells healthy too—exactly what your seeds need!

Soaking the Seeds (Optional but Recommended)

Before sowing soak your okra and coriander seeds overnight in room-temperature water.This helps soften their outer shells and speeds up germination.Skipping this step won’t stop them from growing but you’ll notice a delay of several days as the soil works to naturally break down the seed coats.

In this case, we skipped soaking to show what sowing dry seeds looks like. Just remember: keep the soil consistently moist to avoid any germination issues.

Sowing the Seeds

Now for the fun part—planting!

Step 1: Water the Soil the Night Before

Moisture is key. Watering the night before helps ensure the soil is hydrated without being soggy. It also creates an ideal environment for seeds to wake up and start sprouting.

Step 2: Planting Okra

Okra seeds are fairly large and should be planted about half an inch deep spaced 10 to 12 inches apart.In a 24-inch grow bag, you can plant around 14 seeds.Even if some fail to germinate, you’ll have backups.

Use your fingers to gently press each seed into the soil cover with a light layer and pat it down.

Step 3: Planting Coriander

Coriander seeds are much smaller, so they don’t need to go as deep.Sprinkle them lightly between the okra seeds and around the edges of the grow bag. Cover with a very thin layer of soil—just enough so no seeds are visible.

Tip: Birds love coriander seeds so don’t leave them exposed or you’ll lose your crop before it even starts!

Watering and Moisture Management

The one mistake new gardeners make is inconsistent watering.Here’s the key rule: keep the soil evenly moist but not waterlogged.A shower head watering can is ideal for this as it distributes water gently and evenly.

Too much water will rot seeds.Too little water and they’ll think it’s not safe to grow.Strike a balance and you’ll see healthy sprouts in a few days.

Ideal Temperature and Timing

March is a great time to plant okra and coriander in most regions.As long as night temperatures don’t drop below 10°C seeds should germinate well.Check your local weather forecast before sowing.

In our case we planted on March 8, and conditions were ideal. Within 7–10 days you’ll start to see life!

Using Plant Tags

Here’s a simple trick to make your garden smarter: cut your seed packet attach it to a stick and label it with the date of sowing or your name.This helps you track germination timelines and see which seeds perform best over time.

Harvest Timeline

Coriander: Ready for harvest in 3 to 4 weeks after planting. You can snip leaves as needed or harvest the entire plant.

Okra: Begins fruiting in about 45–60 days. Harvest when the pods are 3 to 4 inches long—before they get too tough.

Harvest regularly to encourage the plant to keep producing!

Common Issues and How to Avoid Them

No germination? Check watering levels. Dry patches or soaked areas can delay or stop sprouting.

Yellowing leaves? This could be poor soil drainage or overwatering.

Pests? Neem oil spray works wonders and is safe for edible plants.

Final Thoughts: Why Homegrown Is Best

The taste the texture the health benefits—homegrown vegetables just hit different. No chemicals, no preservatives—just clean water clean soil and your own two hands.It’s fresher safer and frankly more fun than anything you can buy in a store.

Growing okra and coriander together is not just a smart space-saving technique—it’s a simple way to double your harvest and your happiness.Whether you’re gardening on a balcony patio or backyard, this method works beautifully.

FAQs – How to Grow Okra (Ladyfinger) and Coriander in Grow Bags at Home

🌱 How to grow okra (ladyfinger) at home in grow bags?

You can easily grow okra in a 24-inch wide and 12-inch deep grow bag. Use rich, loamy soil mixed with compost, water consistently, and place the bag in a sunny spot. Okra is great for small-space or balcony gardening.

🌿 Can I grow coriander and okra together in one grow bag?

Yes! Growing coriander with okra is an excellent example of companion planting. Coriander stays low and matures quickly, while okra grows tall and slow, so they work really well together without competing.

🗓️ What is the best time to plant okra and coriander at home?

The ideal time is early spring, especially during March, when temperatures stay above 10°C at night. Warm, consistent weather helps both seeds germinate successfully.

💧 Should I soak okra and coriander seeds before planting?

Soaking seeds overnight in room-temperature water can speed up germination. It’s not essential, but it does help get things going faster.

📏 How deep should I plant okra and coriander seeds in containers?

Plant okra seeds about ½ inch deep and space them 10–12 inches apart. Coriander seeds can be lightly sprinkled on the surface and gently covered with a thin layer of soil.

🚿 How often should I water potted okra and coriander plants?

Keep the soil evenly moist but not waterlogged. A gentle shower from a watering can helps avoid disturbing the seeds. Consistency is key to healthy sprouts.

🌾 What is the best soil mix for growing okra and coriander in containers?

Use a mix of loamy soil with 30–50% organic compost and some vermicompost. This blend provides the right balance of drainage and nutrients for both plants.

⏳ How long does it take to harvest coriander and okra at home?

Coriander is ready for harvest in about 3–4 weeks. Okra takes 45–60 days to start producing. Harvest okra pods when they’re 3–4 inches long to keep them tender.

🐛 What are common problems in homegrown okra and coriander plants?
  • 💧 No sprouts? It might be due to dry or soggy soil.
  • 🍂 Yellowing leaves? Usually caused by poor drainage or overwatering.
  • 🦟 Pests? A neem oil spray works well and is safe for edible plants.
♻️ Can I reuse soil in grow bags for the next season?

Definitely. Just remove any old roots, loosen the soil, and mix in fresh compost or vermicompost. You can also add natural soil conditioners like neem cake to improve quality.

🛒 Where can I buy seeds and compost for container gardening?

You can find seeds and compost at local nurseries or online gardening stores. Look for high-germination seeds and organic compost blends for best results.

🏡 Why should I grow vegetables like okra and coriander at home?

Homegrown veggies are fresher, chemical-free, and taste way better than store-bought. Plus, it’s a satisfying hobby that connects you with nature and your food.

A Brief History of Okra

Okra often called ladyfinger has roots that stretch back thousands of years.Most historians agree it first grew in the fertile lands of Ethiopia and Sudan long before it spread across the world. Ancient Egyptians were among the first to cultivate it loving its tender pods and unique texture.

From Africa okra traveled along ancient trade routes into the Middle East and the Mediterranean.By the 12th century it had found a second home in India, blending beautifully into local cuisines. Thanks to its tolerance for heat and drought, okra thrived wherever it was planted.

Okra made its way to the Americas during the dark era of the transatlantic slave trade. Enslaved Africans carried okra seeds across the ocean, planting them in the unfamiliar soils of the southern United States.Over time okra became a cornerstone of Southern cooking especially in famous dishes like gumbo—a word rooted in African languages.

Today whether it’s stewed fried, or added fresh to a salad okra remains a favorite in kitchens around the world.Its journey through history isn’t just about farming it’s a story of resilience tradition and flavor passed down through generations.

Medical Benefits of Okra (Ladyfinger)

When it comes to health benefit okra is truly a hidden gem.This humble vegetable is packed with soluble fiber making it great for digestion and helping to stabilize blood sugar levels over time. Thanks to its rich antioxidant content okra also plays a role in protecting the heart and keeping cholesterol in check.It’s loaded with vitamin C which gives your immune system a solid boost and supports healthier, more radiant skin. And if you’re watching your weight okra low calories and high fiber help keep you feeling full longer without overdoing it.Its vitamin A and beta-carotene are a blessing for your eyes promoting good vision as you age. Plus, the natural anti-inflammatory compounds in okra offer gentle relief for joint pain and stiffness.Expecting mothers can especially benefit from its folate which supports healthy baby development.One more amazing thing? The sticky, mucilaginous texture of okra actually binds to toxins in the gut helping your body cleanse naturally. With so much packed into such a simple vegetable, okra deserves a lot more love on our plates.

Indoor Vegetable Garden: How To Grow Vegetables Indoors

Just think about being able to pick your salads of lettuce, tomatoes, or herbs anytime from the windowsill right in your kitchen during the winter season. Despite all these, it is possible to grow vegetables indoors provided you follow the following strategies to make your indoor space a veritable vegetable farm. This ultimate indoor vegetable garden guide will guide you from novice to expert – or from the complete basics of growing indoor veggies to what kind of plants will flourish indoors and what conditions they will require.
Why Grow Vegetables Indoors?
Growing vegetables indoors is highly advantageous in various ways, as are the following. It enables you to be able to get fruits and other perishable items at any point in the year regardless the prevailing weather conditions. Second, it eliminates the need for outside space and can be achieved in any size of house including apartments. Further, soil bourne pests, weeds and harsh weather conditions are elimination since your vegetables are grown under controlled conditions indoors.
Now let’s consider the process of creating a productive indoor garden and discuss the answers to some frequently asked questions about growing vegetables at home.

What kinds of garden vegetables can be grown indoors?
While not all vegetables can grow well indoors there are so many that can do well in these conditions. Here’s a list of vegetables that grow particularly well indoors:
Leafy Greens: Lettuce, spinach and arugula are examples of fast-growing plants which do no necessarily require a lot of light for growth.
Herbs: Basil, cilantro, parsley, and thyme have been discovered to be easy to grow even in the windowsill or under artificial lights.
Tomatoes: Even such husk variety as cherry tomatoes – will fit the containers well if there is enough light.
Peppers: Indeed, like tomatoes, peppers will also grow well in containers placed in adequately lighted areas and warm environment.
Radishes: These grow very fast and are not very big.
Carrots: It’s better to select small or baby varieties, which require shallow soils for growing.
Microgreens: They are rich in nutrients and are suitable to be grown in limited space and they take only few days to grow .
Pro Tip:
Try to find “dwarf” or “container” sorts of the vegetables you like most because such plants are developed for being grown in limited spaces.

Growing Vegetables at Home using Grow Lights


They are a necessity if your house is located in an area where there is low natural light especially if it’s winter. Here’s how to effectively use them for indoor gardening:
Choose the Right Type of Light:
Fluorescent Lights: Studies for rather large or bulky types of plants such as greens and herbs.
LED Grow Lights: Energy saving and emit full-spectrum light that is natural such that it can be used to grow fruits such as tomatoes and peppers.
Positioning the Lights:
Position the lights 4–6 inches from your plants and the distance should be maintained as the plants grow. If it is kept too far from the light, the plants become tall and skinny as they grow towards the light source, if it is placed too close the light burns the leaves.
Light Duration:
The majority of vegetables require a light period of 12 to 16 hours to endorse their growth and development. When making the change, it is important to mark time for purposes of comparison for the two methods.
Reflect Light:
Put aluminum foil around your plants to make sure the light is focused on your plants uniformly.
How to Grow Vegetables Indoors with Grow Lights?
Much of the success of indoor gardening relies on the choice of the soil mix to be used. Styling of indoor plants dictates that the growing media should be light, porous to prevent water logging and allow correct aeration of the plants’ roots. Here’s what you should look for:
Potting Mix: Ideally, a good potting mix that has been prepared more for container gardening should do well. It is lightweight but it has moisture retaining capacity while having good drainage features.
Additives: One should add perlite or vermiculite into the mix if the look and feel of the mix is to be enhanced a little more in terms of aeration. Compost can also contribute to the soils nutrient content.
Do not use the garden soil in the yard or outside area for use indoors since they can quickly compact and bring unwanted pest and diseases to your plants.

Which Vegetables Are Best for Cultivation in Apartments?


If you live in a small apartment with not much floor space for pots or with no balcony to place your plants, do not despair, most of the vegetables can be grown in small pots or on window ledges. Here are some of the easiest to start with:
Herbs: I also discovered that herbs such as basil, mint and oregano are very suitable to grow in small spaces.
Salad Greens: Some of the jewels include lettuce, spinach, arugula highly prolific plants that do not need deep pots.
Radishes: These are very small root vegetables and they like shallow pots.
Green Onions: their propagation is fairly simple through stem cuttings; it has a continuous bearing habit.

Temperature Control: The Key to Healthy Growth


Temperature changes happen indoors and out, however most vegetable gardening require a temperature of between 65-75°F (18-24°C). For winter season, they should be positioned near the window where there is no draft and the temperatures should not fall during the night. For additional warming, use space heaters of small size and bring optimum conditions if necessary.
Most green plants such as lettuce, spinach can endure low temp while plants such as tomatoes, peppers require warm atmosphere. With all those plants, focus on the demand that a specific plant requires for it to grow optimally.
Why Not Hydroponics for Faster Indoor Plant Production
Hydroponic is another method of growing vegetables indoors; where plants are grown with washing water, rather than soil. This kind of gardening is ideal for indoor use because the systems do not require frequent irrigation, require lesser space, and produce the plants faster than in the soil.
It’s especially helpful for produce that grows quickly, such as lettuce, spinach, and herbs. It is possible to buy many small hydroponic kits which can be placed on a counter tops or even a window sill. Furthermore, hydroponics has brought about high risks of pests; therefore it is safer for growing crops indoors.

Indoor Vegetable Garden: How to Grow Vegetables Indoors Easily
If you are thinking of establishing an indoor vegetable garden then relax because it is easier than you thought. Follow these simple steps:
Choose a Spot: Any good location that offers natural light will do but prefer a location that faces the sun, usually towards the south. However, if the conditions are poor with less light trying to grow, use grow lights.
Containers: Where possible, the use of pots with small holes on the bottom to avoid accumulation of water is recommended. It can be done in earthen pots or in lots of containers that can be scooped from yogurt cups to plastic bottles.
Soil: They should be planted with a light potting mix media or any other media that is far from compact garden soil.
Watering: Adorned inside the house require water but also avoid watering them until the soil is soggy. H2O when the surface layer looks & feels dry at least an inch down.
Fertilizing: Take a balanced fertilizer every few weeks in order to supply your plant with all the nutrients it requires for growth.


Growing Vegetables Indoors for Beginners
Growing vegetables indoor is a hobby that can be undertaken by anyone as a beginner’s guide to gardening. If you are to start a garden then start with ease and start planting herbs, salad and planting radish. It is very fast-growing and practically demands no maintenance.
Here’s a beginner’s checklist for indoor gardening:
From the tiniest pots with a few herbs to the chaos of eclectica.
If necessary, utilize a basic grow light solution and arrangement.
Water often but do not allow the earth to become watery.
Be patient! It can take some plants time to get off the ground and therefore, may require the user’s patience to grow well.

How to Grow Vegetables Indoors Without Sunlight

If you are unable to provide natural light then grow lights will be your new best friend. Traditional LED grow lights offer all the required bands of light, necessary for plant photosynthesis. Place them near the plants and give the plants at least 12 hours of light every day.
There are plants that thrive in very little light and include plants such a mushrooms and microgreens.
Vegetables You Can Grow In Wintering Under Controlled Environment
Indoor gardening enables you take fresh vegetables all through the year regardless of the harsh weather. Here are some cold-hardy vegetables you can grow indoors:
Kale: It is a cool weather crop that can be grown inside the house.
Spinach: Spinach: Spinach thrives indoors all winter and only requires moderate light to grow very fast.
Carrots: The small varieties can be planted and grown all through the year indoors in containers.
Garlic Greens: If you plant garlic cloves in the soil, you will be trimming fresh garlic greens all through winter.


Indoor vegetables garden and lamps.
One of the best additions for people serious about maintaining their indoor garden all year it is the grow lights. They enable you to elongate the growing period so that your vegetables are exposed to the right amount of light no matter the prevailing weather. Lighting height should be changed alongside plant growth and light should be provided at fixed intervals during the day.

Vegetables You Can Grow Inside an Apartment
You do not have to let this stop you from farming if you are living in an apartment. In this case you will realize with a few pots and the right setting you can grow so many vegetables indoors. Select small plants with rapid growth such as herbs, salad, and most micro greens to use as listed criteria. Stacking systems or hanging baskets are other options that will ensure that you make a vertical impression from your plants.
Best Vegetables to Grow Indoors Under Lights
Some vegetables, in particular, do very well under grow lights. Here’s a list of the best candidates:
Lettuce: Associated with high light intensities and highly reusable as well as multiple harvest yields.
Tomatoes: Dwarf varieties are best grown under grow lamps, especially the LEDs.
Peppers: Much like the tomato plant, peppers require a great deal of light in order to set fruit.
Herbs: Two herbs that grow well under artificial light are basil, parsley and cilantro.
Vegetables You Can Grow At Home

Fastest Growing Vegetables Indoors
If you’re eager to start harvesting your indoor garden, choose fast-growing vegetables like:
Radishes: Sites ready within 25 days and which is ready for harvest.
Lettuce: It takes approximately 1 month to harvest this crop.’
Microgreens: These small but nutritionally rich plants can be cut for reuse after only a week and a half to two weeks.
Spinach: A spinach type green that matures quickly, in about 4-6 weeks.

Additional Tips:
Watering: Avoid water logging to prevent root rot, water your plants when the soil feels dry.
Humidity: Ensure good humidity the tropical vegetable like peppers should be grown under moderate humidity condition.
Fertilization: Applying an equal opportunity fertilizer is advisable on monthly basis for the plant to grow to its optimal size.

This table provides a quick reference for indoor vegetable gardening success, taking into account the season, time to maturity, lighting, temperature, and additional care tips.

Conclusion: Start Your Indoor Vegetable Garden Today!
To get you started with the plans of having indoor vegetables today, the following tips should help you.
Vegetable growing at home could be a demanding but fascinating activity which enables its producer to have fresh vegetables all through the year. Whether you are constrained to small space by living in an apartment, or just want to garden during winter, this guide gives you all the basics. Finding good vegetables, grow light, and the right soil to transplant your indoor vegetables garden is however easy.
Now we are ready to get our hands dirty, take our pots and plant! And the satisfaction of collecting your home grown vegetables is just a few weeks away.